Tuesday, July 29, 2014

Pork Roulade filled with Peaches & Jalapeno

Like most people, I get into ruts of things I like to cook.  For about three days straight, I have made some version of a roulade, whether with chicken or pork.  So, for the next few days, I will be posting about some different bacon wrapped & smoked roulades.

There are some constants when I do these, and that is, they are bacon wrapped and then smoked.  In my opinion, two things that make almost any food better.

I won't delay, or bore you any more... For this roulade, I pounded the pork chop flat.  I seasoned it with a salt, black pepper, and garlic mixture.  Then I layered peaches and jalapeño. (Side note: the peaches will "literally" melt into the meat, which is absolutely fantastic!)


Once that is done, I wrap it with bacon!


The last step of course is to smoke it, and I usually let it smoke for about 3 hours... Give or take a few minutes.  After you pull it off the grill, let it rest a few minutes before you carve it.


Finally, you can serve it with pretty much anything you want, but I opted for a vegetable cous cous with red onion, red pepper, and corn.


Monday, July 28, 2014

French Toast - the simple things in life

I've never been a huge fan of French toast... It usually is soggy, flavorless, and just disappointing!  I am more of a fried pancake or crisp waffle kinda guy, however, if you use a good, slightly stale bread, it can make a world of difference.

I still don't make french toast all that often, so when I do, I like to use something other than a basic white bread.  There are so many types of bread you can use, marbled rye, brioche, cinnamon raisin, banana bread... the choices are pretty much endless.

I like to (when I can) use sourdough bread.  So any time I have leftover bread, I'll let it sit for a few days, that way it's not super fresh.  I use a very basic recipe (no need to get too fancy), but if you're inclined to class it up, feel free after you dunk the bread in your egg mixture to "crust" it with crushed up cereal (frosted flakes, honey nut Cheerios, or captain crunch).

I start by cutting the bread in half (only if they are big slices)

then I make the egg mixture*,

and after my griddle is hot (I heat it to 300 to 325 degrees), I'll dredge the bread and slap it on the griddle!  I like a crispier outside on my french toast, so I'll let it cook a good 5-8 mins per side.


When the French toast is cooked to your liking, add your favorite toppings, pour a glass of cold milk, and enjoy!


*French Toast Egg Mixture

Ingredients:
- 3 large eggs
- 3/4 cup milk
- 1/4 teaspoon Ground Cinnamon
- 1/8 teaspoon Ground Nutmeg
- 1/8 teaspoon Ground Clove
- 18 teaspoon Ground Allspice

directions:
Whisk everything together. 
I use 3 large pieces of bread, or 6 regular size slices.

(just a note, I like a little more spice than most, you can definitely cut back the nutmeg, clove, and allspice, or leave it out all together)

Tuesday, July 15, 2014

Smoked Whole Chicken with a Bacon Blanket

If there is any way to make a whole smoked chicken any better... it might be, to add a blanket of bacon to it!  I know what you're thinking, a bacon blanket will make anything better... and I really have no argument for that because I agree 100%.
But I digress, and as for the smoked chicken, it's a pretty standard affair.  I start by giving it a good dry rub of some spices.  The spices tend to vary from time to time, depending if I have left over blends, etc., but for this chicken, I use my BBQ rub (I won't share the measurements, but I will tell you what I put in it*) after I give it a good coat of rub, I then hit it with some "Tony's" creole seasoning, then let it sit for a few minutes while I fire up the grill/ smoker.

*Basic BBQ Rub (this is a very basic rub, that I am constantly changing, but these ingredients are all standard in all of my rubs)
brown sugar
kosher salt
garlic powder
paprika
ground onion
ground mustard
celery salt
ground black pepper

Once the grill is ready, I put a pan of liquids underneath where the chicken will be (and this pan can consist of anything you want, beer, soda, water, broth... anything you want to flavor your meat with).  Then I place the chicken on the grill, add wood, cover, and let it smoke.

This chicken smoked for about 5 hours total, and around the 3 hour mark, I added the bacon blanket.
Before I added it, I baste the chicken with the juices that were underneath.  {insert drooling here}  and then once the chicken was covered, I let it smoke a few more hours. The process involved rotating the chicken, basting, adding more wood, adding more coals, etc. occasionally.  The tricky part about smoking meat, is you have to pay attention to the needs, how hot is your grill, how much smoke should you have, is the meat cooking evenly, is it drying out... The more you smoke things, the more attuned you get to these issues.

Some people don't think it's worth the time and energy to smoke things on the grill, but for anyone who has ever tried it... they will tell you the results are worth it.

Monday, June 30, 2014

Alabama White Sauce Smoked Chicken

Let me start by saying, "This is my version of Alabama White Sauce".  Having stated that, I have known about Alabama white sauce for several years, but I've never made it.  Never tried it for that matter, but as I was trying to come up with something to grill this last Friday, I wanted to do something I've never done... Enter Alabama white sauce.

I was lucky enough to come across the idea while I was reading my copy of Bon Appetit's July issue.  It was briefly mentioned in an article (it was also mentioned how good it was on smoked chicken)... I was sold!

I came home, and got my chicken prepped, which was simply rubbing it with; kosher salt, white sugar, creole seasoning (Tony Chachere's), black pepper, cayenne pepper, and garlic powder.  After this was done, I coated it with Old Bay seasoning, and soaked some pecan wood chips.  Once this was done, I whipped up the Alabama white sauce.

To be quite honest, after I made the sauce, and TASTED it, I thought it was kinda gross, but I was going to put it on the chicken, hoping that that would make it better... and I'm soo glad I did.  It balanced the smoke, and there was a little heat from the cayenne, then a mellowness that came from the mayo in the sauce.  I digress..

 Once the chicken had been smoking for about 1 1/2 hours, I began a process of brushing on the sauce, flipping the chicken, then brushing on more sauce.  I did this a few times, then placed the chicken over the fire, and did the same thing.

When I pulled the chicken off, I brushed a little more sauce over it, and let it sit for a few minutes before I devoured it like a Caveman!


Without further adu...


Alabama White Sauce
ingredients:
1 cup Mayo
1/2 cup Apple Cider Vinegar
1 Tablespoon Lemon Juice
3 Tablespoons Honey
1 Tablespoon Cracked Black Pepper
1 teaspoon Cayenne Pepper
1 teaspoon Garlic Powder

Directions:
1.  Mix everything together
2.  Refrigerate for at least 30 minutes
3.  Apply liberally to your food and enjoy!


Sunday, June 22, 2014

Hand-Crafted Beef Jerky (Peppered)

One of my favorite snacks, is beef jerky.  I used to eat... I still eat pretty much any kind of jerky, but I have become more select in the brands or types I choose.  My all time favorite brand is Mingua Beef Jerky (it's a Kentucky made jerky, soo good), but seeing as I live in UT, and ordering jerky online is quite expensive... And I only visit KY about once a year, I hand craft my own "artisan" beef jerky!

There are a lot of styles, flavors, etc. when it comes to jerky.  One of my goals, besides flavor, is to let it compliment the natural beef flavor.  I already have a few different types I've done, Asian, spicy Asian, BBQ, garlic, and peppered.

I will keep creating different flavored beef jerky, but for now, I leave you with:

Peppered Beef Jerky (I'm am still playing around with this recipe):
Ingredients:
1/2 cup Fresh coarsely ground black pepper (use as little as much as you want)
1 Tablespoon coarse kosher salt
About 1 lb thinly sliced beef (I try to use a sirloin style chuck roast, because it's leaner with less fat marbling)

Directions:
Jerky prep step 2.  salt and pepper both sides
1. Slice the meat to the thickness you want (freezing the meat to where it's partially frozen helps with slicing*)
2.  Salt and pepper both sides of meat
3.  Refrigerate for 8 - 24 hours
4.  Lay strips of jerky on your dehydrator trays
5.  Start dehydrator, let run 4 hours before messing with it
6.  After 4 hours, begin checking the jerky every 30 mins. (The thinner the piece, the sooner they will be done, and depending in whether you want a chewy jerky or not, will also change the amount of time)
7.  Once the jerky is done, let it cool down before storing

*for more consistently sliced pieces, use a meat slicer

Sunday, June 15, 2014

Smoked Chicken Wings - Father's Day Tribute

I would venture to say that over Father's Day weekend... Most people are firing up their grills, smokers, and barbecues!

Well, I'm no different, despite that my dad lives halfway across the country from me, I grilled out in his honor this weekend anyway.  

I strongly believe that every son should learn certain things from their father, I.e shaving, driving a stick shift, that the best snack is popcorn with BBQ chips mixed in and an iced cold coke... And of course, the ART OF GRILLING!

Some of my fondest childhood memories (other than my twin and me getting caught stealing treats) was when my dad would fire up the grill, and throw some delicious meats on to cook.  Over the years, I have developed my own skills, recipes, and style of grilling, and a lot of that I contribute to my father.

Just a few of the mouthwatering meats that have kissed the playful smoke and fire of my grill:

And in honor of my father Larry Sloop, here is...

Smoked Chicken Wings:

Ingredients:
Chicken Wings
Your favorite buffalo sauce (I make a Honey-Buffalo Sauce, but if I don't have that, I would use anything with Texas Pete hot sauce)
Kosher Salt
Black Pepper
An injector

Directions:
1.  Inject the wings with some of your buffalo sauce (or any other marinade or sauce, like a cajun butter)
2.  Season the wings with salt and pepper (or an appropriate rub depending on your marinade, Tony Chachere's creole season if you use a cajun butter marinade)
3.  Fire up your smoker (if using a regular grill, concentrate your heat on one side)
4.  Place your wings on the grill, add your choice of wood (I usually use apple-wood, but hickory, cherry or pecan wood would be good)
5.  Let smoke about 1 1/2 hours, adding more wood if necessary, and flipping the wings over halfway through cooking.
6.  when ready, place wings over the heat, and brush on your sauce.
7.  Grab some napkins, and dig in (after letting rest for a few minutes)

Sunday, June 1, 2014

Maple Sausage and Jalapeño Gravy over Biscuits

Anyone who is a true southerner... Will always love a good gravy biscuit!  There are many places that have really good sausage gravy and biscuits, probably my favorite is Bojangles!  I would be there now if there was one located here in Utah.  Alas there is not, so I resort to the next best thing!  I make it myself.

Making biscuits and gravy should be a rite of passage for any southerner... But I'm afraid it is not... We should pass a law, but I digress... This particular day, I opted for maple sausage and added some diced jalapeño for a little heat.  It was surprisingly good.

Basic Sausage Gravy (this recipe is not exact, I didn't measure, I just eyeballed everything)*
Ingredients:
1/2 package ground sausage
3 Tablespoons All purpose flour (about)
1 cup Milk (about)
Salt and pepper to taste

Basic sausage gravy is simple enough: You start by browning your sausage over medium heat, then drain it depending on how much grease there is.  Next you want to add flour, and stir it in with the sausage, and let it brown just a bit (or longer if you want a darker gravy), then add your milk, stir fairly constantly until it starts to thicken.  I find that if I turn off the heat just before the gravy is the consistence I want, it will continue to thicken up.  I also usually add some salt and pepper to mine, to taste of course.


* to make what I did, just use maple flavored sausage and add a diced jalapeño to the sausage as you brown it.

Wednesday, May 28, 2014

Flank Steak with Chimichurri and Grilled Corn

This past weekend, I decided to take a "vacation" and visit my brother and his family.  Usually, when I get together with my brother, a few things tend to happen... 1. We watch a lot of Seinfeld and the Simpsons,  2.  We drink a fair amount of soda (or any caffeinated beverage we can find), and 3.  We usually cook something pretty good.

With the weather being nice, and it almost feeling like summer, we decided we wanted to grill some steak... and some corn.  But what to serve with it, how to prepare it, sauce, no sauce, rub, no rub, smoked, straight grilled... the options are endless (almost).  My brother had stumbled across a recipe for a Chimichurri topped steak in Martha Stewart Living Magazine.  I'm not generally one for following recipes, but it sounded good, so we decided to try it.

the recipe for Chimichurri: (from Martha Stewart Living as I remember it)
1/3 cup packed chopped Parsley
1/3 cup packed chopped Cilantro
1/4 teaspoon minced garlic
3 Tablespoons Red Wine Vinegar
1/2 cup Olive Oil

blend everything together, drizzle over steak and corn once they've been grilled.

We grilled the corn first, and once there were good grill marks on it, we popped in a 250 degree oven to rest and stay warm while we grilled the steak.  All we did for the steak was salt and pepper it, slap it on the grill, once it was about medium rare to medium, I pulled it off, let it sit, sliced it, and then drizzled the sauce over it.  I also drizzled the sauce on the corn as well... Hopefully the picture speaks for itself... It was pretty dang good.

Saturday, May 17, 2014

Apple-wood smoked Baby-back Ribs

For those of you about to grill... I salute you.  Summer is upon us, and the weather is getting warmer.  So it's time to fire up the charcoal, rub down a rack of ribs, crack open an ice cold soda, and smoke the ribs for a few hours!

I am constantly tweaking how I do my ribs, but I tend to always come back to the same procedure.  I rub down the ribs, then smoke them, then wrap them, then brush on sauce at the end.  It may seem like a crazy process, but it's totally worth it.  The ribs develop so much flavor, and are cooked to where there is still a little give (the common misconception is that ribs should come clean of the bone, but this isn't true, you want to see a bite mark). 

Here is my process:

Ingredients:
About 3/4 cups of BBQ Rub*
1 rack Baby Back Ribs
1 Tablespoon Squeeze Butter
1 Tablespoon of Honey
2 Tablespoons of Brown Sugar
1 teaspoon Sriracha
About 8 small to medium size branches of Applewood, broken into pieces
Aluminum foil, enough to wrap the rack of ribs in

Directions:
1. I remove the silver bit of skin from the back of the ribs... there are YouTube videos on how to do this.
2.  Rub the ribs with BBQ rub (I make my own, but you can use your favorite), let sit for 15 - 30 minutes.
3.  Get your smoker ready (since I just use a round weber grill, I get my charcoal ready, and put it on one side of the grill).
4.  When you're ready to put the ribs on the grill, add about half of the apple-wood to the fire (if you're using a gas grill, use a smoker box for your wood).
5.  Place the ribs away from the fire, bone side down, close the lid and let it smoke for about 1 hour.
6.  At around an hour in, rotate your ribs and add more apple-wood, close the lit and let it go about another half hour.
7.  Pull the ribs off the grill, place on a sheet of aluminum foil (enough to wrap the ribs in) add butter, honey, brown sugar, and sriracha, wrap the ribs.
8.  Put the ribs back on the grill, away from the heat again, let cook about a half hour.
9.  After a half hour, rotate the wrapped ribs, and let go another 15 minutes.
10.  After 15 minutes or so, remove the ribs from the aluminum foil, place over the heat and baste on your choice of BBQ sauce (something with vinegar works best, and once again, I make my own 3 Vinegar BBQ Sauce).
11.  Baste the ribs a couple times on both sides, and then let cool for a few minutes before eating.


*All Purpose BBQ Rub (mix all ingredients together, makes about 1/2 cup)
1/4 cup Brown Sugar
1/2 teaspoon Cayenne Pepper
1 teaspoon Paprika
1 teaspoon Garlic Powder
1/2 Tablespoon Ground Black Pepper
1/2 Tablespoon Sea Salt (you can always add a little more if want)
2 teaspoons Ground Onion Flakes
1 teaspoon Ground Mustard Powder


Sunday, May 11, 2014

Mother's Day Tribute

Like most people, I am fortunate to have a loving mother in my life.  But I am equally blessed to have had other motherly influences in my life...  This is my tribute to those influences, because without them, I would not have the best parts of me!


The biggest influences that my mom, grandmothers, sisters... and even ex-mother in law, have had on me, revolves around my passion for food!  To begin:

Grandmothers - On both sides of my family, my grandmothers always cooked!  I unfortunately didn't get to spend a lot of time learning from them, since I was pretty young (and all I cared about was playing, watching TV, and eating junk food, when I could get it).  But, I have had the opportunity to go through old recipes, and talk with my parents about dishes and meals they cooked.  I try to honor my heritage by cooking some of the these meals (with some tweaks, of course).

Sisters - My twin sister is "mostly" a vegetarian (probably why I eat so much meat... I have to balance the deficit of meat consumption!)  And my other sister is an avid (and awesome) baker.  My twin is probably my biggest fan, and that inspires me to keep cooking.  Since I don't do much baking, I can always ask my other sister questions and it helps build my relationship with her.

Ex Mother in law - despite my feelings towards her, I can appreciate the fact that she introduced me to a lot of international foods and cultures, and thus helped further my passion for food.

My Mother - she taught me the value of family dinner and the amazing power of a good meal, which can bring anyone together!  Plus, every time I talk to her about something I've made, I can sense a certain amount of pride she has for me.

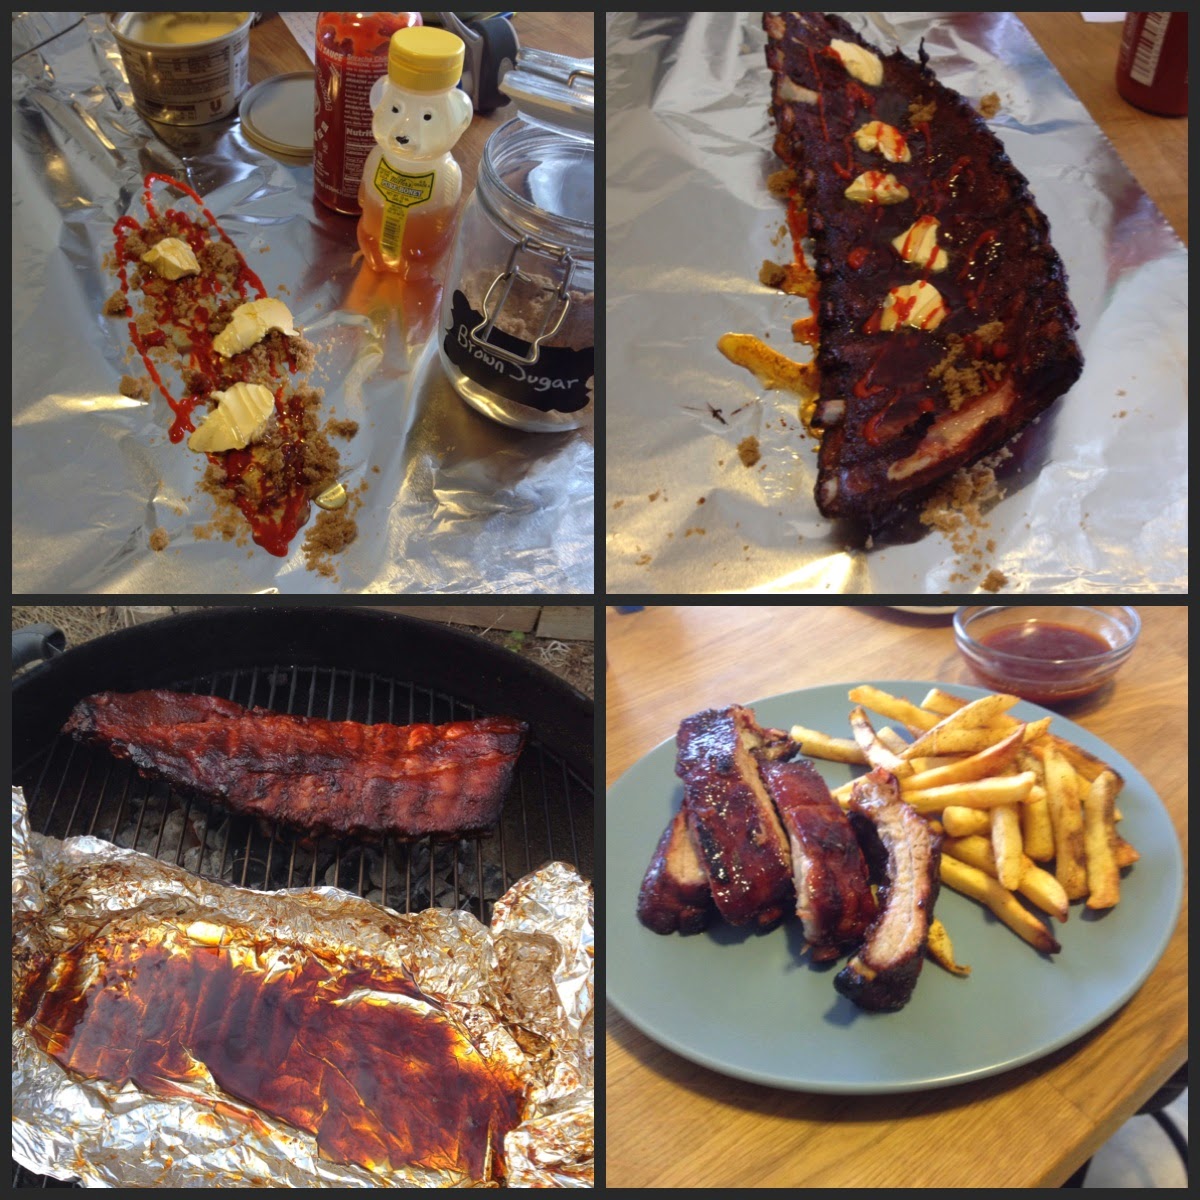
So as a tribute to these wonderful influences and ladies of my life, here are a few foods and meals I have made over the years!  In the pictures are: Homemade Bread, Sausage Gravy Waffles, Deviled Eggs, Pot Roast with Carrots, Onions, & Potatoes, Rotisserie Pork, Thai Curry Soup with Chicken & Dumplings, Shrimp Boil, Smoked Chicken, BBQ Ramen Noodles, Apple-wood Smoked Ribs, Bacon Wrapped Pork Roulade over Fettuccine with Vegetables, Peach & Blueberry Pie with a Crumble Crust

As a bonus:  a recipe for Thai Curry Soup with Chicken and Dumplings (second group of pictures, top right)

Ingredients:
3 chicken Thighs
1 can Coconut Milk
2 cans Chicken Broth
1 Red Bell Pepper, diced
1 Medium White Onion, diced
3/4 cups Carrot, roughly chopped
4 oz Red Curry Paste
2 Tablespoons Sriracha Chili paste
4 teaspoons Vegetable Oil
2 Pillsbury Grand Biscuits, cut into small squares
2 Tablespoons Thai Curry Rub*
A handful of chopped Fresh Cilantro, for garnish


Directions:
1. Heat oil in a stock pot, add onions, carrots, and peppers.
2. Saute for about 8 to 10 minutes on medium heat.
3. Add curry paste and saute for a few more minutes, until the paste starts to caramelize in places.
4. Meanwhile, season chicken with Thai Curry Rub* and in a seperate pan, brown chicken thighs for a few minutes on each side.
5. Once the vegetables and curry paste are ready, add chicken broth, sriracha paste, and coconut milk to the pot.
6.  Whisk to incorporate everything together (the coconut milk may be clumpy, but it will loosen up).
7. Add the chicken.
8. Let simmer on medium low for about 20 to 25 minutes.
9. Stir every 8 to 10 minutes, making sure nothing sticks to the bottom, taste, add more Thai Curry Rub if you feel you need a little more flavor.
10. Remove chicken and pull off the bone, shred it, and add it back to the pot.
11. Drop in your biscuit cubes, a handful at a time, make sure they don't stick together.
12. Let simmer an additional 8 to 10 minutes, or until the dumplings are cooked through.
13. If liquid reduces too much, add in a little water, and adjust your seasonings as needed.
14. Garnish with chopped Cilantro.

* Thai Curry Rub (mix everything together, makes about 1/2 cup)
2 Tablespoons Turmeric
2 Tablespoons Curry powder
2 Tablespoons Kosher Salt
1 teaspoon Ground Black Pepper
1 teaspoon Garlic Powder
1/4 teaspoon Cayenne Pepper
1 teaspoon Paprika

Monday, May 5, 2014

Cinco De Mayo

Cinco de mayo is here... So this is my obligatory "holiday" post.  A few weeks ago I made some jalapeño-garlic grilled steak sandwiches... And since the steak was so good, I decided to make some tacos with pico de gallo, and guacamole!

I didn't do anything special with the pico or the guacamole (besides using red onion, fresh garlic, and jalapeño), so I'm not gonna post any recipes this week, but I believe the key to celebrating any holiday, is try to create flavors that make you think of what you're celebrating.  With every bite of these "tacos" I tasted a little bit of Cinco De Mayo!


Monday, April 28, 2014

A tasty farewell for a friend

Let me start by apologizing to those who were not invited... This was an impromptu gathering, and I have a small apartment that just can't accommodate everyone I would have liked to invite.  Rest assure there will be future "Super Fancy Finer Things Supper Catering Club Parties" (this is the name that we will be calling our food club gatherings!)

That being said, last week, a few co-workers and myself, decided to have a farewell "party" for our friend and co-worker, Dalin.  I figured what better time to break out a bacon wrapped, apple & jalapeno stuffed pork loin... and don't forget apple-wood smoked!  But since we work in catering, we are not content to just have one delicious item.  Our menu consisted of:

Appetizers
Spinach and Artichoke Dip with Toasted Baguette Slices
Deviled Eggs with Pickled Daikon Radishes, Pickled Red Onion, and Sriracha

Entree
Apple-wood smoked Bacon Wrapped, Jalapeno & Apple stuffed Pork Loin
Twice Baked Macaroni and Cheese

Dessert
 Layered Strawberry Short Cake (seriously, so good!)


I find that an evening full of good food, and good company is a hard thing to beat... And let's just say, I wish I had a larger stomach, so that I could have kept eating.  Everything was sooo good.  I won't bore you with 5 different recipes, but at some later point, I will re-post a few of these items and I will include some recipes.  Until that time, you just have to take my word that it was delicious.

 And finally... Farewell Dalin and good luck in Texas!

Tuesday, April 22, 2014

Grilled Jalapeno Steak Sandwich

I love sandwiches... let me correct that, I love good, flavorful sandwiches!  I have dreams of one day, opening a sandwich shop, featuring more upscale sandwiches than, let's say, Subway or Jimmy Johns... But, I digress, back to the topic at hand, sandwiches, especially a Grilled Jalapeno Steak Sandwich.

I'm sure you have had sandwiches somewhat like this one, but it doesn't change the fact that it is delicious.  I start by taking diced up jalapeno, minced garlic, kosher salt, and a squeeze from 1/2 a lime, and I grind this mixture with my mortar and pestle.  in the meantime, I take the flank steak, salt and pepper it, then rub it down with the garlic-jalapeno mixture.  I let this goodness sit for at least 30 minutes to semi marinate (and develop some more flavor).  When i feel the steak is good and ready, I fire up the grill, get it nice and hot, and then slap the steak on the grill.

While my steak is getting grilled, I whip up some quick guacamole... I am under the impression that everyone has their favorite guacamole recipe, and specific dos and don'ts with what you can or can't add to your guacamole.  I say, knock that noise, because there are very few rules in cooking, and if it sounds and taste good, go for it.  Anyway, I start by mushing up my avocado, then add diced jalapeno, finely diced white, yellow, or red onion (all depends on what I have in my fridge), then add minced garlic, a squeeze of lime, some kosher salt, and black pepper... done!

By this time, my steak should be about a good medium rare or medium, but cook it how you like it.  Then I let the steak rest, and tighten up and retain all those delicious juices.  When its ready, I slice it, and layer it on my bread (for this sandwich I used a cut down baguette).  Before that, I spread mayo on the bottom and the guacamole on the top piece.  Then goes on the steak, then some queso fresco (any crumbly Mexican cheese works).  If I had some red onion, I probably would have grilled them and added them to the sandwich.

Grilled jalapeno steak sandwich with garlic fries and guacamole


Sunday, April 20, 2014

Apple-wood smoked pork, bacon, red onion, and alfredo pizza

Last weekend, I decided to have my friend Anjo over... It was a pretty nice day, and any time the weather is remotely nice, I want to fire up the grill.  The only downside, was, I had no extra money to buy food!  So, I started rummaging through the fridge, freezer, and my cabinets.  I had some boneless pork ribs in the freezer, 1/2 a red onion, some garlic (in a jar :( unfortunately), half a jar of store bought Alfredo sauce, and some BBQ rub. 

So I thought to myself, what can I make... could I do barbeque Alfredo?  I always have some kind of pasta noodles lying around... but I wasn't in the mood for pasta.  Then it hit me, why not combine two things I love, BBQ and PIZZA.  I began to hatch a plan to make a BBQ pork Alfredo pizza.  I thawed out the pork and some thick cut bacon I had in the freezer as well.  Rubbed it all down with my all purpose BBQ rub, diced up the red onion, and mixed it with some jar minced garlic, butter, Worcestershire sauce, salt and pepper and foil wrapped those goodies.  Then we chimney started the fire (because there is no other way to start a charcoal fire), added some apple-wood to the charcoal, and then put the pork, bacon, and foil-wrapped onions on the grill to smoke for about an hour... The smell coming off of that grill was killing me!

In the meantime, I whipped up a basic pizza dough recipe, and we got that all spread out on a pan and ready to be topped.  At some point, I flipped the bacon over, rotated the pork, moved the onions around, and added a little more apple-wood.  When the pork was about ready, I pulled the bacon and onions off, added some 3-Vinegar BBQ sauce (my own creation) to the bacon grease that was still in the foil from the bacon... and we basted the pork with this creation sent from heaven... I mean, bacon grease and BBQ sauce mixed together, shut the front door!!!

After we had basted the pork, we pulled it off the grill and let it sit for a minute while we started adding the other ingredients to the pizza.  But first things first, we melted some butter and added grated Parmesan, minced garlic, BBQ rub, and some crushed red peppers, and then we spread this flavor creation over the whole crust.
 
then, we added the Alfredo (which we mixed in some red onion, red pepper, bacon relish... for an added ump-ff) and then drizzled 3-vinegar BBQ sauce over that.  At this point, the apartment is smelling like some amazing creation... MOUTH IS WATERING.

next step, we added the onions, then bacon, then pork... topped it with mozzarella, cheddar, and an Italian cheese blend.  Baked it for about 15 minutes or so and then gorged ourselves on BBQ pork Alfredo goodness.


Below is my basic pizza dough recipe... I believe the trick to good home-made dough, is good yeast, and letting it rise for the appropriate time.

Ingredients:
1 cup warm water
1 pkg active dry yeast (2 1/4 teaspoons)
1 teaspoon brown sugar
1 teaspoon coarse kosher salt
2 cups All Purpose flour
1/2 cup flour for kneading

Directions:
1. Dissolve yeast in warm water.
2. Let sit for 5 to 10 minutes, until it's getting foamy.
3. Add sugar and let sit for about a minute.
4. Add salt, stir.
5. Stir in 2 cups of flour, 1/2 a cup at a time.
6. Knead for a few minutes until it starts to feel a little firm.
7. Let rise in a warm place for about 30 minutes, or until doubled in size.
8. Punch dough down, turn out onto floured surface, and knead until firm, smooth and elastic.
9. Sprinkle a little flour over top, cover with a towel, and let rest for about 5 minutes.
10. Roll or stretch dough to fit your pizza pan.
11. Pre-heat your oven to 450 degrees, bake crust for about 5 minutes.
12. Turn oven down to 375 degrees, top your pizza, and bake for about 15 minutes (cooking time varies, depending on how crispy you want the pizza).